고정 헤더 영역
상세 컨텐츠
본문
1. 개요

1.1 개발하고자 하는 기능/App 설명
1.2 기본적인 설계
- 환경 구성
개발 환경 구성에 가장 빠른 것은 사실,,, Cloud IDE에 설치되어 있는 이미지를 사용하는 것이다. 다만, Cloud IDE (Goorm IDE , Cloud 9 등)에 세팅된 환경은 Expo를 기반으로 하고 있다. Expo는 다양한 측면에서 매우 훌륭한 도구 이지만, Native Module을 사용하는 경우 정상동작하지 않는다. Expo eject 등을 실행하여 기존 구성된 bundle 구조를 쪼개야 하는데, 이것은 react-native-cli 로 환경을 구성하는 것 보다 더 어려운 작업을 포함한다.
따라서, 간략한 테스트는 Cloud IDE를 사용하여 테스트하고, 실제 개발 작업은 Local 환경에서 react-native-cli 환경을 구성하는 것이 바람직하다 하겠다.
* react-native-cli의 표준 환경이 ⇒ npx react-native init 로 변경되었다.
2.1 Node 개발 환경 구성
|
brew install node brew install watchman |
2.2 모바일 앱 시뮬레이터 환경 구성
iOS : Xcode 설치
-
XCode 설치 후, XCode > Preference 에서 Components 탭 에서 시뮬레이션 기종 선택


* 시뮬레이터 환경이 제대로 갖추어져 있지 않으면, ‘pod install’ 을 실행 혹은 ‘react-native run-ios’ 등 구동 명령어를 실행 할 때, 시뮬레이션 환경을 실행할 수 었다는 에러가 발생한다.

|
sudo gem install cocoapods |
|
npx react-native init myMemo |
* react-native-cli 를 설치할 경우, 향후 에러를 발생할 수 있다. deprecated 될 듯
Android : Android Studio 설치
JDK Development Kit 설치한다.
|
brew tap AdoptOpenJDK/openjdk brew cask install adoptopenjdk8 |
Android Studio를 설치한다. 설치 시 다음 옵션이 체크 되어야 함을 확인 한다.
-
Android SDK
-
Android SDK Platform
-
Performance (Intel ® HAXM) (See here for AMD)
-
Android Virtual Device
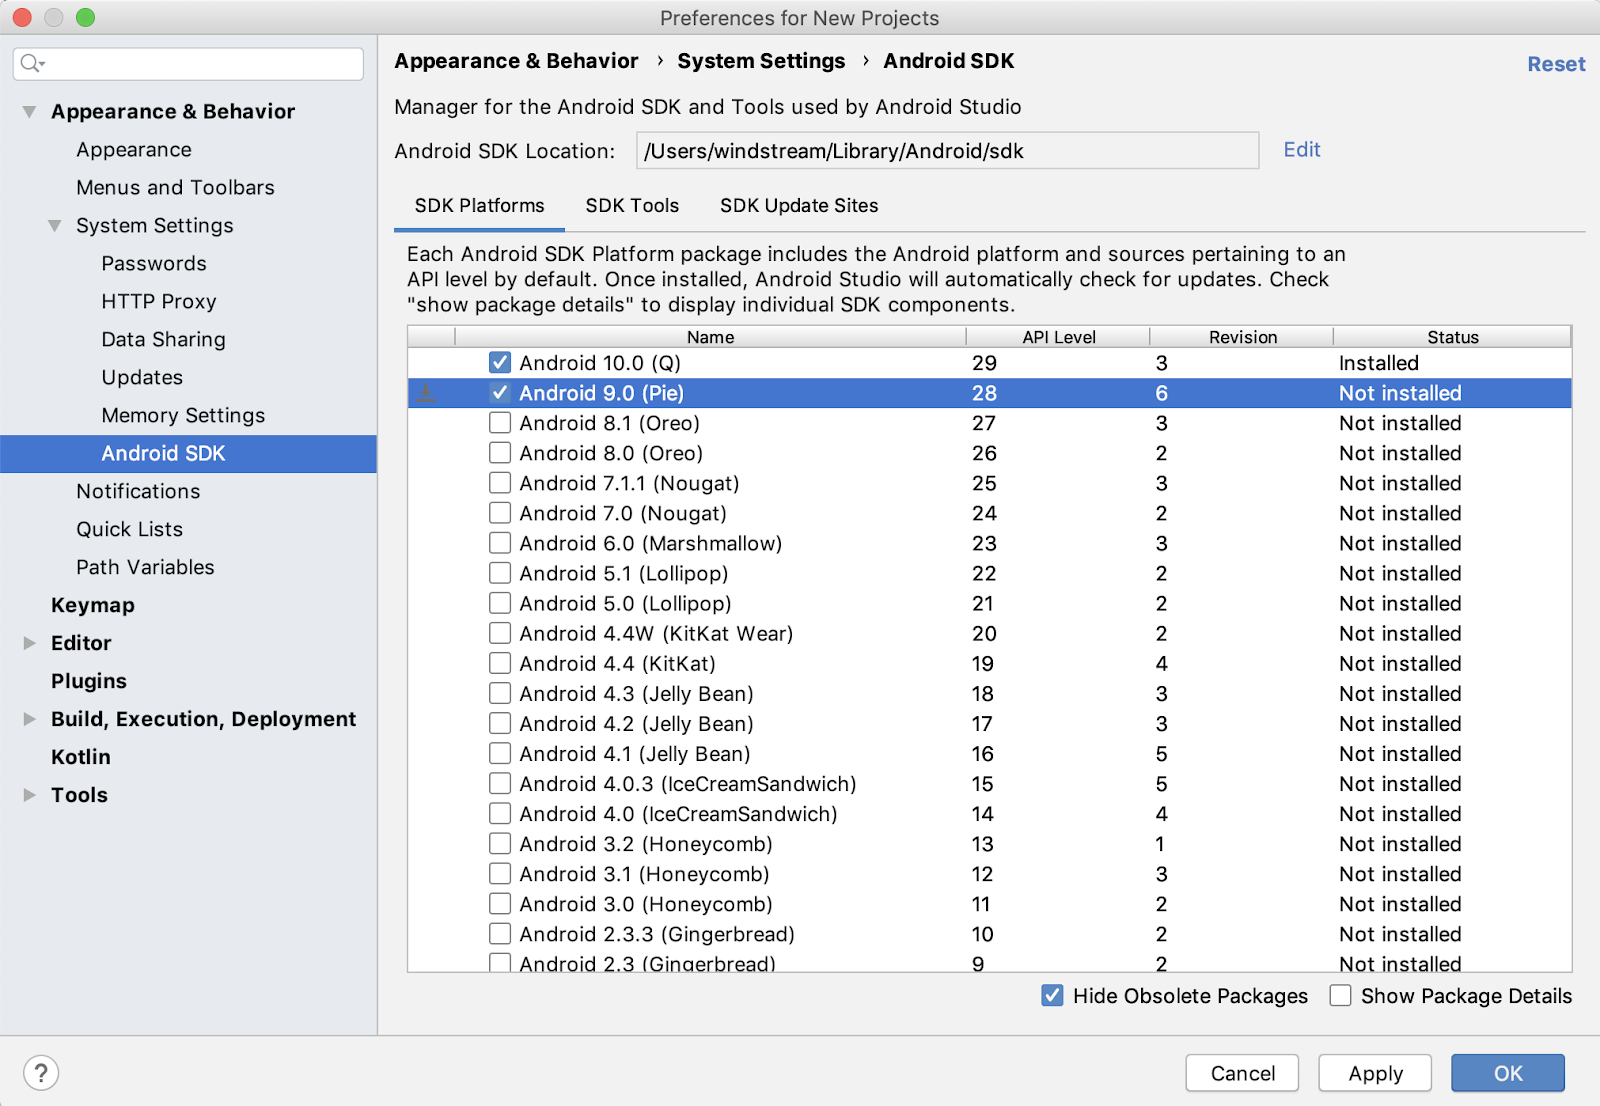
최신 Android Studio를 설치하면, 최신 버전의 Device Android 의 SDK가 기본으로 설치된다. 그러나, React-Native가 아직 해당 디바이스를 지원하지 않으므로, 현재 시점에서 지원하는 단말중 최신인 Android 9 SDK를 추가해 주자.
Android SDK는 Android Studio 에 있는 SDK Manager 통해서 인스톨 할 수 있다.
SDK Manager는 Android Studio를 실행하면 나오는 첫 화면의 아래쪽에 Configure > SDK Manager에서 실행 할 수 있다.

Android 9 (Pie) SDK 버전을 체크하고, 아래 옵션들을 확인 한다.
-
Android SDK Platform 28
-
Intel x86 Atom_64 System Image or Google APIs Intel x86 Atom System Image

다음으로, Android Home 환경 변수를 설정한다.
. HOME/.bash_profile or $HOME/.bashrc
~/bash_profile 또는 ~/.bashrc 에 아래 환경변수를 추가해 준다.
|
export ANDROID_HOME=$HOME/Library/Android/sdk |
|
환경변수 적용을 위해서, source 를 실행한다. |
디바이스 준비 : Physical Device or Virtual Device / Simulator 준비
물리적인 Android Device를 사용한다면, USB를 직접 연결하여 사용하면 된다.
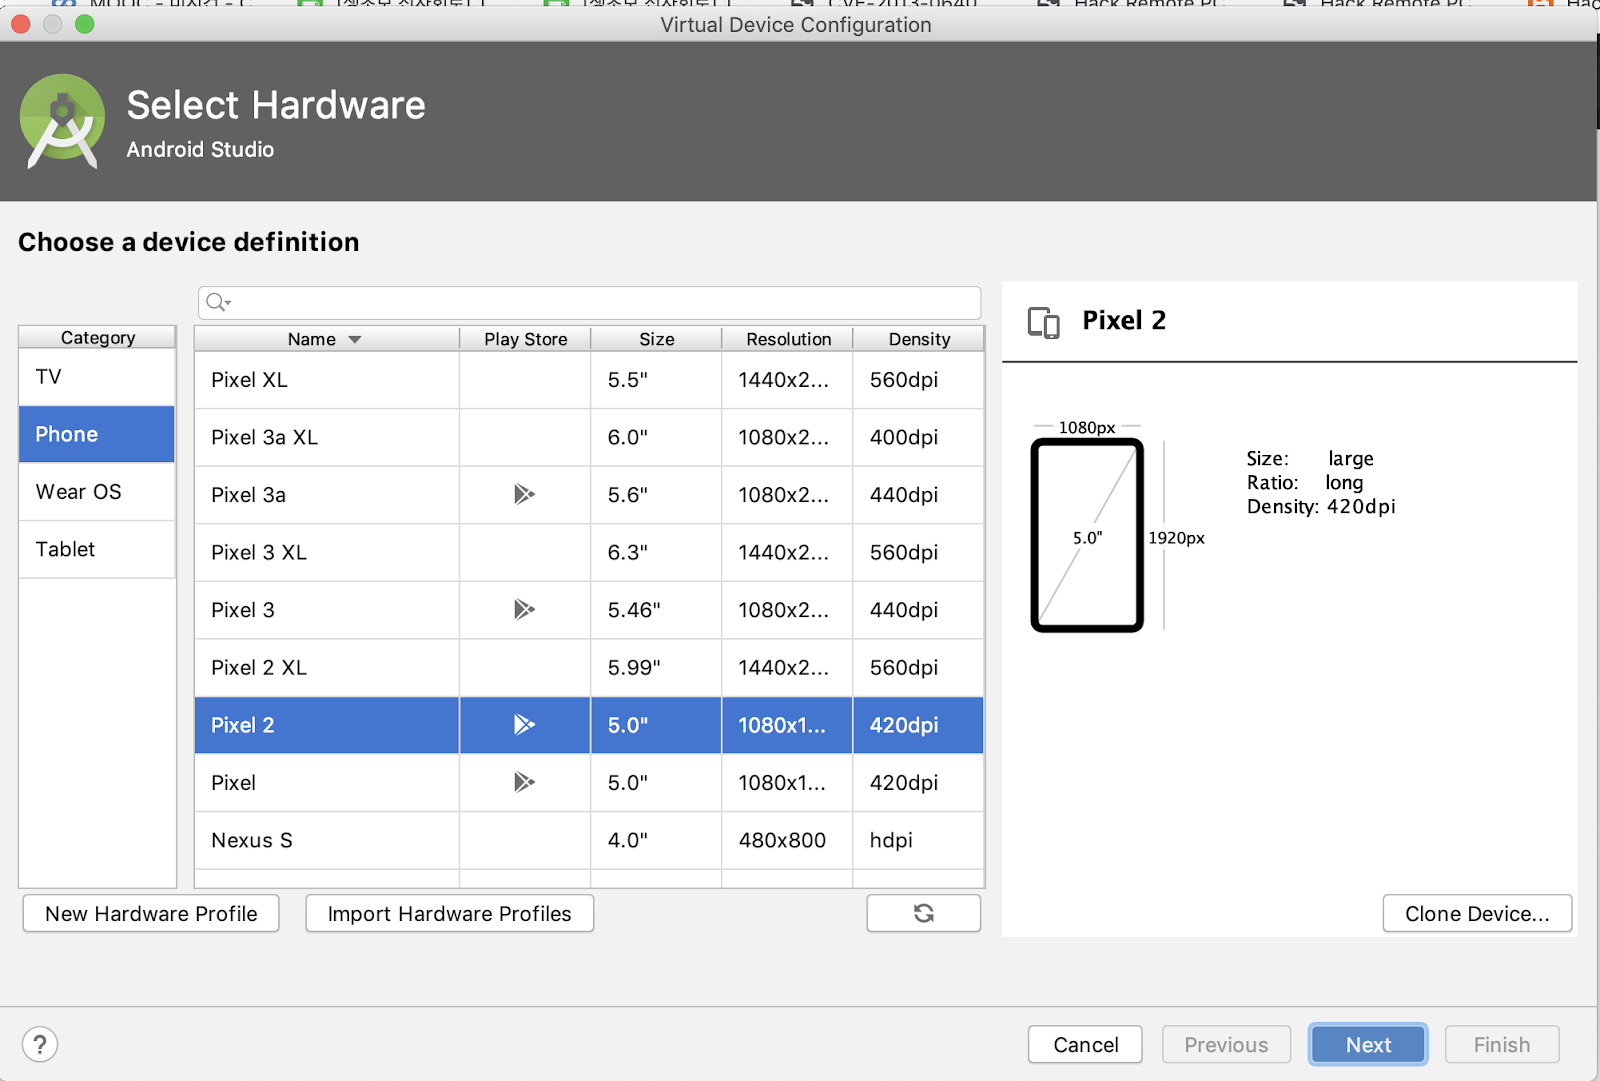
Virtual Device 및 Emulator를 이용할 경우, AVD (Android Virtual Device Manager) 를 설정한다.

Create Virtual Device 버튼을 눌러서, Select Hardware Menu로 이동 한다. 적절한 H/W를 선택해 준다. (크기/해상도 등을 확인한다.) 다음 버튼을 누르면, System Image를 선택하게 된다.

앞서 설치한 SDK에 부합하도록, Pie (Android 9)을 설치해 준다.

Next를 눌러서, 다음으로 진행하면, Virtual Device가 준비된 상태이다.
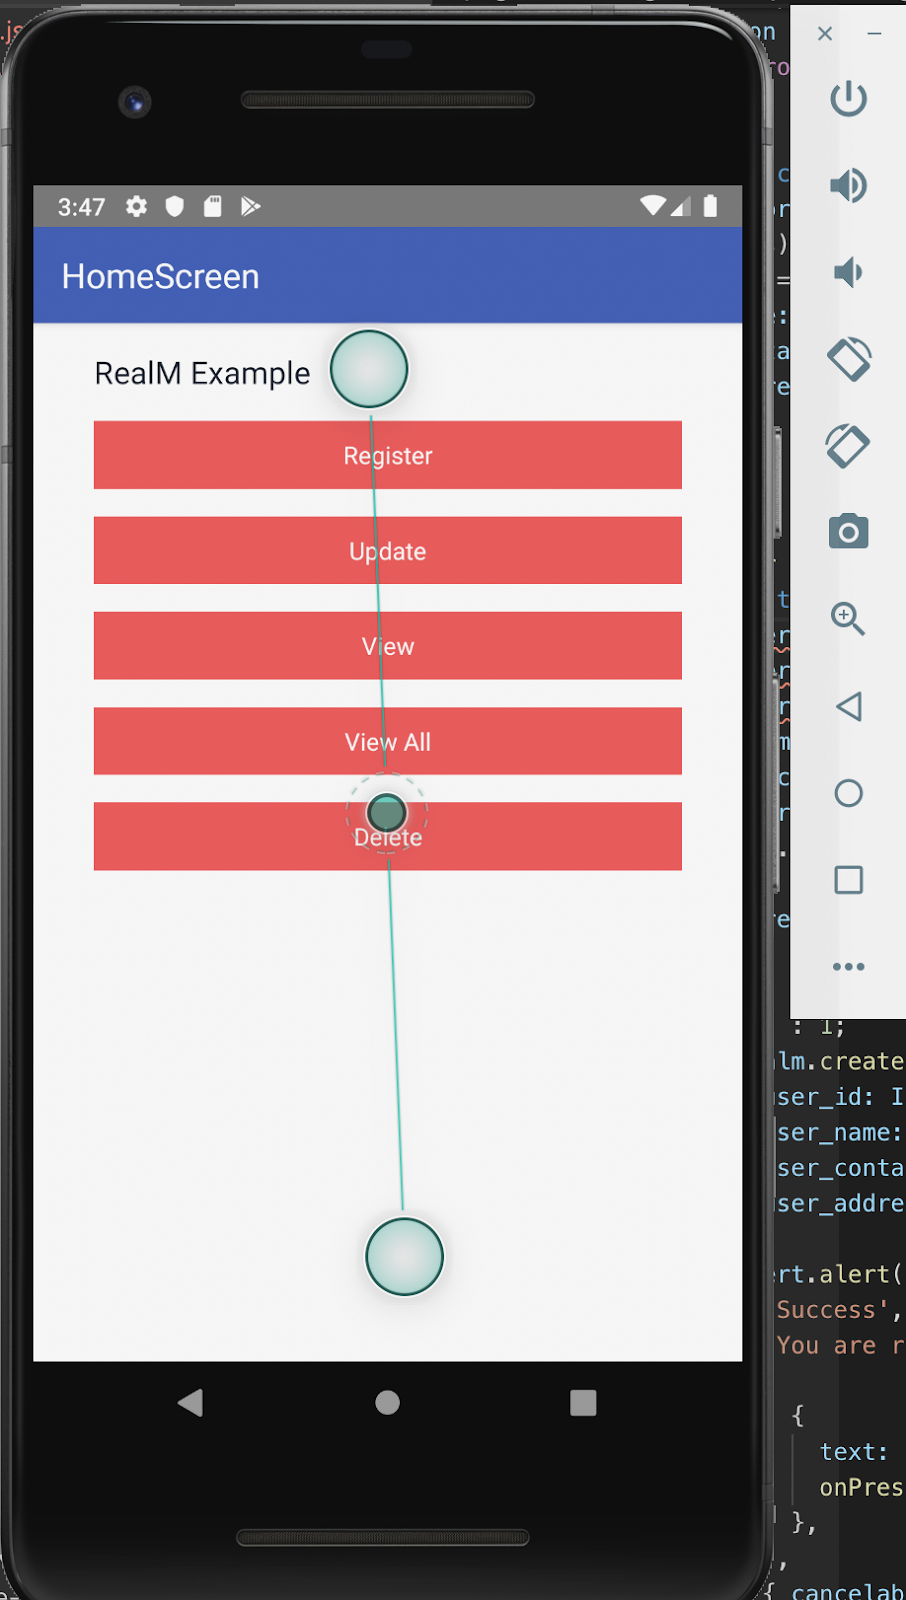
이후, Command Line 에서 ‘ npx react-native run-android ‘ 명령어를 통해서 안드로이드에서 구동하는 앱을 확인할 수 있다.

< Android 9이 구동중인 Pixel 2 가상 디바이스 준비 상태>

< 가상 디바이스 환경에서 안드로이드 구동 화면>
2.3 React-Native-cli 설치 및 환경구성
|
$ npm install -g react-native-cli $ npx react-native init myMemo |
2.2 Module 및 Component 설치
-
설치 컴포넌트
react-navigation
react-native-gesture
realm
|
cd myMemo npm install react-navigation --save npm install react-native-gesture-handler --save npm install react-navigation-stack --save npm install realm --save |
react-native 0.6 이후 부터는 자동 link를 해 주지만, realm의 링크가 잘 안된다는 이슈들이 보고되고 있어서, 명시적으로 링크해 준다.
|
$ react-native link realm |
|
대부분의 경우, 이미 link 되어 있어, 다음과 같은 메세지를 출력한다. info iOS module "realm" is already linked info Android module "realm" is already linked |
iOS의 경우, cocoaPod를 사용하면 자동 처리해 준다.
|
cd ios && pod install && cd .. |
-
compiler error 가 발생할 경우 다음을 실행:
-
sudo xcode-select -s /Applications/Xcode.app/Contents/Developer/
환경 구성 최종 테스트
|
npx react-native run-ios |
|
npx react-native run-android |
실행결과의 예)
iOS : ( react-native run-ios 실행 )
|
|
|
|
⌘R 를 입력하면 리프레쉬 |
Android : ( react-native run-android 실행 )
|
|
- 개발 착수

- 업데이트
- 디자인 보정
- Codes
|
App.js |
|
/*Example of RealM Database in React Native*/ import React from 'react'; //For react-navigation 3.0+ //import { createAppContainer, createStackNavigator } from 'react-navigation'; //For react-navigation 4.0+ import { createAppContainer } from 'react-navigation'; import { createStackNavigator} from 'react-navigation-stack'; import HomeScreen from './pages/HomeScreen'; import RegisterUser from './pages/RegisterUser'; import UpdateUser from './pages/UpdateUser'; import ViewUser from './pages/ViewUser'; import ViewAllUser from './pages/ViewAllUser'; import DeleteUser from './pages/DeleteUser';
const App = createStackNavigator({ HomeScreen: { screen: HomeScreen, navigationOptions: { title: 'HomeScreen', headerStyle: { backgroundColor: '#3a59b7' }, headerTintColor: '#ffffff', }, }, View: { screen: ViewUser, navigationOptions: { title: 'View User', headerStyle: { backgroundColor: '#3a59b7' }, headerTintColor: '#ffffff', }, }, ViewAll: { screen: ViewAllUser, navigationOptions: { title: 'View All User', headerStyle: { backgroundColor: '#3a59b7' }, headerTintColor: '#ffffff', }, }, Update: { screen: UpdateUser, navigationOptions: { title: 'Update User', headerStyle: { backgroundColor: '#3a59b7' }, headerTintColor: '#ffffff', }, }, Register: { screen: RegisterUser, navigationOptions: { title: 'Register User', headerStyle: { backgroundColor: '#3a59b7' }, headerTintColor: '#ffffff', }, }, Delete: { screen: DeleteUser, navigationOptions: { title: 'Delete User', headerStyle: { backgroundColor: '#3a59b7' }, headerTintColor: '#ffffff', }, }, }); export default createAppContainer(App); |
|
Mybutton.js |
|
import React from 'react'; import { TouchableOpacity, Text, StyleSheet } from 'react-native'; const Mybutton = props => { return ( <TouchableOpacity style={styles.button} onPress={props.customClick}> <Text style={styles.text}>{props.title}</Text> </TouchableOpacity> ); }; const styles = StyleSheet.create({ button: { alignItems: 'center', backgroundColor: '#f05555', color: '#ffffff', padding: 10, marginTop: 16, marginLeft: 35, marginRight: 35, }, text: { color: '#ffffff', }, }); export default Mybutton; |
|
Mytext.js |
|
import React from 'react'; import { TouchableHighlight, Text, StyleSheet } from 'react-native'; const Mytext = props => { return <Text style={styles.text}>{props.text}</Text>; }; const styles = StyleSheet.create({ text: { color: '#111825', fontSize: 18, marginTop: 16, marginLeft: 35, marginRight: 35, }, }); export default Mytext; |
|
Mytextinput.js |
|
import React from 'react'; import { View, TextInput } from 'react-native'; const Mytextinput = props => { return ( <View style={{ marginLeft: 35, marginRight: 35, marginTop: 10, borderColor: '#007FFF', borderWidth: 1, }}> <TextInput underlineColorAndroid="transparent" placeholder={props.placeholder} placeholderTextColor="#007FFF" keyboardType={props.keyboardType} onChangeText={props.onChangeText} returnKeyType={props.returnKeyType} numberOfLines={props.numberOfLines} multiline={props.multiline} onSubmitEditing={props.onSubmitEditing} style={props.style} blurOnSubmit={false} value={props.value} /> </View> ); }; export default Mytextinput; |
|
HomeScreen.js |
|
import React from 'react'; import { View } from 'react-native'; import Mybutton from './components/Mybutton'; import Mytext from './components/Mytext'; import Realm from 'realm'; let realm;
export default class HomeScreen extends React.Component { constructor(props) { super(props); realm = new Realm({ path: 'UserDatabase.realm', schema: [ { name: 'user_details', properties: { user_id: { type: 'int', default: 0 }, user_name: 'string', user_contact: 'string', user_address: 'string', }, }, ], }); }
render() { return ( <View style={{ flex: 1, backgroundColor: 'white', flexDirection: 'column', }}> <Mytext text="RealM Example" /> <Mybutton title="Register" customClick={() => this.props.navigation.navigate('Register')} /> <Mybutton title="Update" customClick={() => this.props.navigation.navigate('Update')} /> <Mybutton title="View" customClick={() => this.props.navigation.navigate('View')} /> <Mybutton title="View All" customClick={() => this.props.navigation.navigate('ViewAll')} /> <Mybutton title="Delete" customClick={() => this.props.navigation.navigate('Delete')} /> </View> ); } } |
|
HomeScreen.js 수정 -> bottomTabNavigation 추가 dataSchema 사용 추가 |
|
import React from 'react'; import { View, StyleSheet } from 'react-native'; import Mybutton from './components/Mybutton'; import Mytext from './components/Mytext'; import Realm from 'realm'; import { Button } from 'native-base'; import dataSchema from '../data/dataSchema'; let realm;
export default class HomeScreen extends React.Component { constructor(props) { super(props); realm = dataSchema.realm; }
render() { return ( <View style={styles.TopContainer}> <Mytext text="RealM Example" /> <Mybutton title="Register" customClick={() => this.props.navigation.navigate('Register')} /> <Mybutton title="Update" customClick={() => this.props.navigation.navigate('Update')} /> <Mybutton title="View" customClick={() => this.props.navigation.navigate('View')} /> <Mybutton title="View All" customClick={() => this.props.navigation.navigate('ViewAll')} /> <Mybutton title="Delete" customClick={() => this.props.navigation.navigate('Delete')} /> <Button title="Test Native Base UI" onPress={ ()=> this.props.navigation.navigate('TestNB')} />
<Mybutton title="Test Tab Navi." customClick={ ()=> this.props.navigation.navigate('TabNavi')} /> </View> ); } }
const styles=StyleSheet.create({ TopContainer:{ flex: 1, backgroundColor: 'white', flexDirection: 'column', }, });
|
|
RegisterUser.js |
|
|
UpdateUser.js |
|
/*Screen to update the user*/ import React from 'react'; import { View, YellowBox, ScrollView, KeyboardAvoidingView, Alert, } from 'react-native'; import Mytextinput from './components/Mytextinput'; import Mybutton from './components/Mybutton'; import Realm from 'realm'; let realm;
export default class UpdateUser extends React.Component { constructor(props) { super(props); realm = new Realm({ path: 'UserDatabase.realm' }); this.state = { input_user_id: '', user_name: '', user_contact: '', user_address: '', }; } searchUser = () => { const { input_user_id } = this.state; console.log(this.state.input_user_id); var user_details = realm .objects('user_details') .filtered('user_id =' + input_user_id); console.log(user_details); if (user_details.length > 0) { this.setState({ user_name: user_details[0].user_name, }); this.setState({ user_contact: user_details[0].user_contact, }); this.setState({ user_address: user_details[0].user_address, }); } else { alert('No user found'); this.setState({ user_name: '', }); this.setState({ user_contact: '', }); this.setState({ user_address: '', }); } }; updateUser = () => { var that = this; const { input_user_id } = this.state; const { user_name } = this.state; const { user_contact } = this.state; const { user_address } = this.state; if (input_user_id) { if (user_name) { if (user_contact) { if (user_address) { realm.write(() => { var ID = this.state.input_user_id; console.log('ID', ID); var obj = realm .objects('user_details') .filtered('user_id =' + this.state.input_user_id); console.log('obj', obj); if (obj.length > 0) { obj[0].user_name = this.state.user_name; obj[0].user_contact = this.state.user_contact; obj[0].user_address = this.state.user_address; Alert.alert( 'Success', 'User updated successfully', [ { text: 'Ok', onPress: () => that.props.navigation.navigate('HomeScreen'), }, ], { cancelable: false } ); } else { alert('User Updation Failed'); } }); } else { alert('Please fill Address'); } } else { alert('Please fill Contact Number'); } } else { alert('Please fill Name'); } } else { alert('Please fill User Id'); } };
render() { return ( <View style={{ backgroundColor: 'white', flex: 1 }}> <ScrollView keyboardShouldPersistTaps="handled"> <KeyboardAvoidingView behavior="padding" style={{ flex: 1, justifyContent: 'space-between' }}> <Mytextinput placeholder="Enter User Id" onChangeText={input_user_id => this.setState({ input_user_id })} /> <Mybutton title="Search User" customClick={this.searchUser.bind(this)} /> <Mytextinput placeholder="Enter Name" value={this.state.user_name} onChangeText={user_name => this.setState({ user_name })} /> <Mytextinput placeholder="Enter Contact No" value={'' + this.state.user_contact} onChangeText={user_contact => this.setState({ user_contact })} maxLength={10} keyboardType="numeric" /> <Mytextinput value={this.state.user_address} placeholder="Enter Address" onChangeText={user_address => this.setState({ user_address })} maxLength={225} numberOfLines={5} multiline={true} style={{ textAlignVertical: 'top' }} /> <Mybutton title="Update User" customClick={this.updateUser.bind(this)} /> </KeyboardAvoidingView> </ScrollView> </View> ); } } |
|
ViewAllUsers.js |
|
|
ViewUser.js |
|
import React from 'react'; import { Text, View, Button } from 'react-native'; import Mytextinput from './components/Mytextinput'; import Mybutton from './components/Mybutton'; import Realm from 'realm'; let realm;
export default class ViewUser extends React.Component { constructor(props) { super(props); realm = new Realm({ path: 'UserDatabase.realm' }); this.state = { input_user_id: '', userData: '', }; } searchUser = () => { const { input_user_id } = this.state; console.log(this.state.input_user_id); var user_details = realm .objects('user_details') .filtered('user_id =' + input_user_id); console.log(user_details); if (user_details.length > 0) { console.log(user_details[0]); this.setState({ userData: user_details[0], }); } else { alert('No user found'); this.setState({ userData: '', }); } }; render() { return ( <View> <Mytextinput placeholder="Enter User Id" onChangeText={input_user_id => this.setState({ input_user_id })} /> <Mybutton title="Search User" customClick={this.searchUser.bind(this)} /> <View style={{ marginLeft: 35, marginRight: 35, marginTop: 10 }}> <Text>User Id: {this.state.userData.user_id}</Text> <Text>User Name: {this.state.userData.user_name}</Text> <Text>User Contact: {this.state.userData.user_contact}</Text> <Text>User Address: {this.state.userData.user_address}</Text> </View> </View> ); } } |
|
DeleteUser.js |
|
import React from 'react'; import { Button, Text, View, Alert } from 'react-native'; import Mytextinput from './components/Mytextinput'; import Mybutton from './components/Mybutton'; import Realm from 'realm'; let realm; export default class UpdateUser extends React.Component { constructor(props) { super(props); realm = new Realm({ path: 'UserDatabase.realm' }); this.state = { input_user_id: '', }; } deleteUser = () => { var that = this; const { input_user_id } = this.state; realm.write(() => { var ID = this.state.input_user_id; if ( realm.objects('user_details').filtered('user_id =' + input_user_id) .length > 0 ) { realm.delete( realm.objects('user_details').filtered('user_id =' + input_user_id) ); var user_details = realm.objects('user_details'); console.log(user_details); Alert.alert( 'Success', 'User deleted successfully', [ { text: 'Ok', onPress: () => that.props.navigation.navigate('HomeScreen'), }, ], { cancelable: false } ); } else { alert('Please insert a valid User Id'); } }); }; render() { return ( <View style={{ backgroundColor: 'white', flex: 1 }}> <Mytextinput placeholder="Enter User Id" onChangeText={input_user_id => this.setState({ input_user_id })} /> <Mybutton title="Delete User" customClick={this.deleteUser.bind(this)} /> </View> ); } } |
|
../data/dataSchema.js |
|
import Realm from 'realm';
/* const realm = new Realm({ path: '', schema : [], }); */
const realm = new Realm({ path: 'UserDatabase.realm', schema : [ { name: 'user_details', properties: { user_id : {type: 'int', default:0}, user_name : 'string', user_contact: 'string', user_address: 'string', }, }, ],
});
export default realm; |
|
./pages/TabNavi.js |
|
import React from 'react'; import { Text, View } from 'react-native'; import { createAppContainer } from 'react-navigation'; import { createBottomTabNavigator } from 'react-navigation-tabs';
class TabHomeScreen extends React.Component { render() { return ( <View style={{ flex: 1, justifyContent: 'center', alignItems: 'center' }}> <Text>Tab Home!</Text> </View> ); } }
class TabSettingsScreen extends React.Component { render() { return ( <View style={{ flex: 1, justifyContent: 'center', alignItems: 'center' }}> <Text>Settings!</Text> </View> ); } }
const TabNavigator = createBottomTabNavigator({ TabHome: TabHomeScreen, TabSettings: TabSettingsScreen, });
//export default createAppContainer(TabNavigator); export default TabNavigator; |
기타
NVM
여러 패키지를 설치하여 사용하다 보면, Node 의 버전에 따라서 동작하지 않거나 충돌이 나는 경우가 있다. 이런경우, Node 의 버전을 변경해 주어야 한다.
-
대표적으로 Realm은 Node v11 이상에서 동작하지 않고 있다. (2019.11월 현재 까지는)
-
npm install --save realm 을 진행하면 에러가 발생하다. node v10.16을 사용하면 발생하지 않는다.
이런 경우가 발생할 때마다 매번 node를 재 설치하기 어렵기 때문에, Node의 버전을 변경하고 관리하는 툴이 필요하다. 이것이 NVM ( Node Version Manager)의 역할 이다.
|
설치 |
|
brew install nvm |
|
[brew로 설치가 안될 경우]
|
설치 후 nvm 경로 등록과 nvm.sh 실행을 위해서, ~/.bash_profile에 아래와 같이 설정/추가 (이미 추가되어 있을 수 도 있다.)
|
export NVM_DIR="$HOME/.nvm" [ -s "$NVM_DIR/nvm.sh" ] && \. "$NVM_DIR/nvm.sh" # This loads nvm |
|
[ bash_profile 변경 내용 적용] source ~/.bash_profile |
설치 확인은 아래 명령어를 실행해 본다.
|
$ nvm $ nvm ls |
node Specific version 설치
|
nvm install 10.16 |
Node Version 변경
|
nvm use 10.16 |
발생가능한 에러/이슈
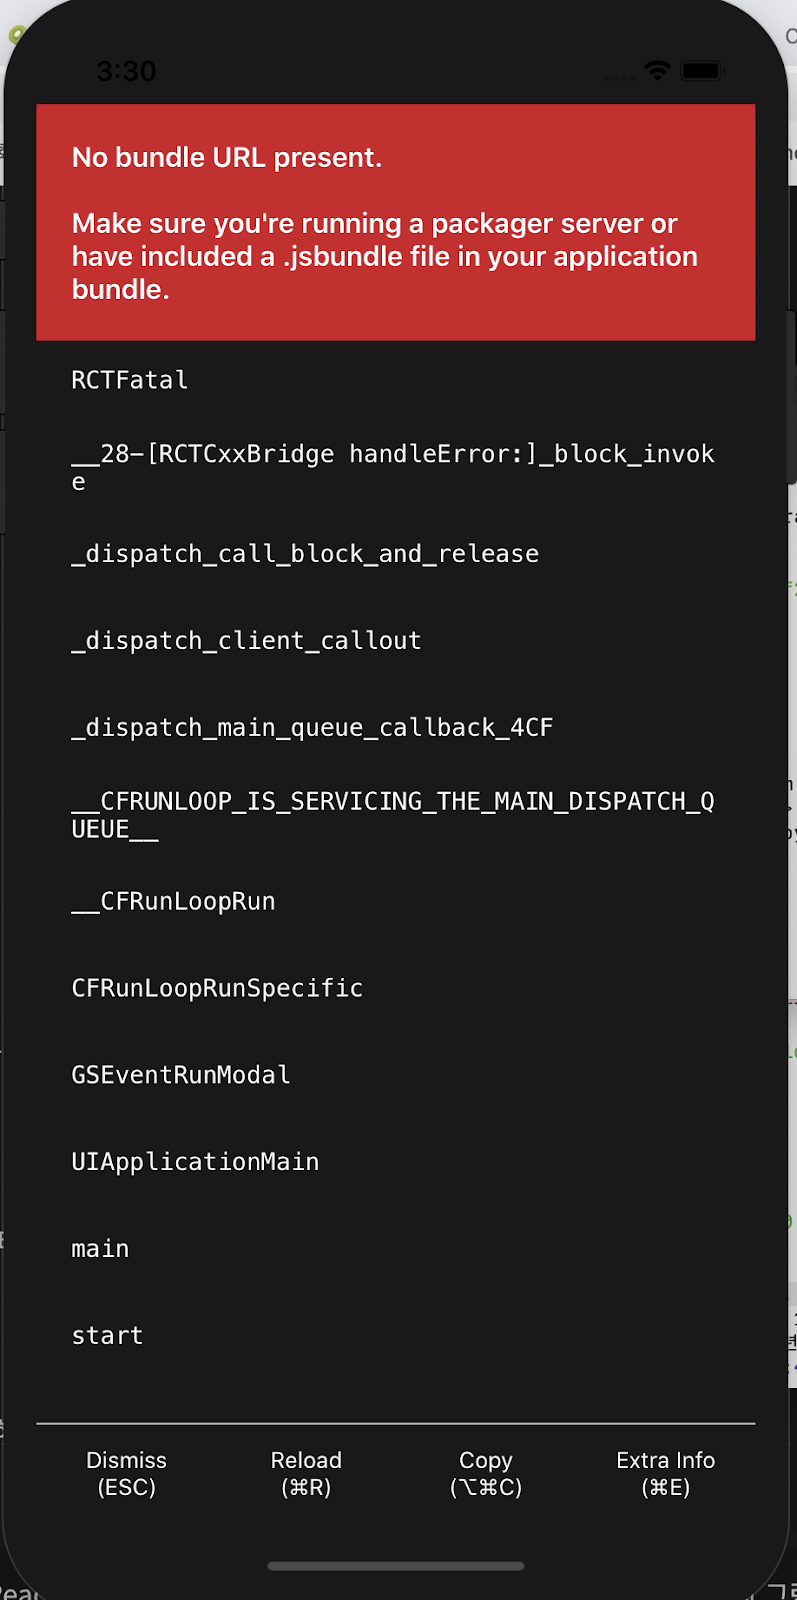
1. No bundle URL Present (iOS)

최종 실행 대상인 bundle.js를 찾을 수 없다는 것이다.
build 파일이 잘 안되기 때문인듯. 상황이 많이 바뀌었는데, 일부만 build 하고, 일부는 기존것을 사용하고 그러다 보니, build가 제대로 되지 않아서 인것 같다.
build 파일을 삭제하고 다시 build 한다.
|
rm -rf ios/build |
2. react-native invariant violation module appregistry (Android)
이 또한 bundle 파일이 제대로 되지 않아서 최초 실행이 잘 안되는 이유 같다. 시뮬레이터를 종료하고, 다시 빌드한다음 실행해 보자.
Node.js 도움 사이트
https://riptutorial.com/ko/node-js/topic/1515/package-json
'개발 이야기 > React-Native' 카테고리의 다른 글
| [React Native Vector Icons] 리액트 네이티브 벡터 아이콘을 달아 보자 (0) | 2020.03.09 |
|---|---|
| Node Module을 React Native 에서 사용해 보자 (0) | 2020.03.09 |
| React JS 입문 - 10만에 보는 리액트 (0) | 2020.03.09 |
| 1. 리액트 네이티브로 Play스토어 앱출시 하기 - 안드로이드 릴리즈 빌드 (Android Release Build) (3) | 2020.03.09 |
| [ React Native ] 리액트 네이티브 10분만에 개발 - 구름 IDE 환경에서 리액트 네이티브 개발 (0) | 2020.03.09 |


댓글 영역