고정 헤더 영역
상세 컨텐츠
본문
반응형

[관련글]
2022.07.11 - [IT 이야기/IT 상식] - AWS교육[요약]-Technical Essential : IAM/Role/EC2/VPC/ELB
2022.07.13 - [개발 이야기] - [AWS 교육 요약] - Developing on AWS (1/4)
2022.07.13 - [개발 이야기] - [AWS 교육 요약] Developing on AWS (2/4)
AWS 데이터베이스 - DynamoDB


[ Amazon DynamoDB ]
- 규모에 따른 성능
- 엔터프라이즈에 사용 가능
- 대기 시간이 짧은 쿼리
- 서버리스 / 완전관리형
- 세분화된 엑세스 제어

DynamoDB는 파티션키를 필수로 요구한다. 왜 그럴까 생각해 보면, NoSQL DB관점에서 각 아이템(행)을 저장할 때 Hash를 사용하는데, Hash의 입력값으로 사용할 키가 필요하다. 이것이 기본적으로는 파티션키이다. 이러한 이유로 파티션키를 해시 속성이라고도 한다.
만약 파티션키 만으로 고유값이 정해지지 않는다면, Secondary로 정렬키를 추가 설정 할 수 있다. 이 경우, Hash의 입력은 파티션키+정렬키가 된다. Sencondary Key가 정렬키라고 부르는 이유는, 파티션키값이 동일한 모든 항목을 물리적으로 서로 가까이 저장하도록 정의할 수 있으며, 이 때 정렬 기준으로 사용하기 때문이다.
DynamoDB 개발/사용의 도구
1) NoSQL Workbench
- Cross-platform 클라이언트 GUI 애플리케이션
- 데이터 모델링, 시각화, 작업 빌더
- PartiQL 지원
2) DynamoDB Local
- 인터넷 연결 없이 로컬에 설치하여, aws cli로 접근
- 처리량, 데이터 스토리지 및 데이터 전송 비용 절감


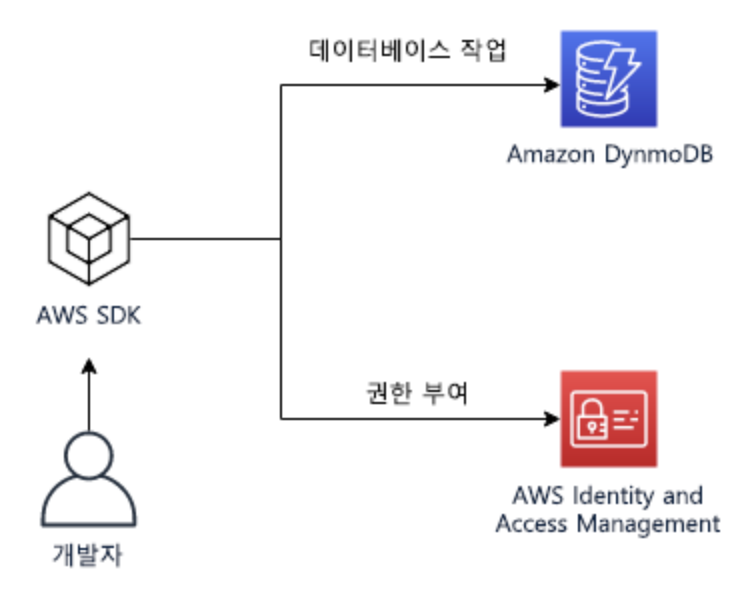
[ DynamoDB에 대한 SDK/API ]


[ DB 제어 ]
- 제어 (DML) : Create, Update, Delete, List, Describe
- 데이터 영역 : CRUD (Put, Update, Get, Delete)
[ DB 설계 ]
파티션키/정렬키의 설계에 따라서 "질의"가 아닌 "스캐닝"이 되어 버릴 수 있다.
아래 예의 경우, 좌측은 NoteId를 파티션키로, 우측은 UserID를 파티션 키 (+ 정렬키)로 생서하였다. 이 경우 만약 UserID=="StudentC"인 조건으로 검색을 한다면,
- 좌측의 설계는 StudentC를 조회하기 위해서 전체 "스캔"이 발생함
- 우측은 UserID가 파티션 키로 설정 되었기 때문에 --> Indexing이 UserID로 생성되었고 --> Hash( key )로 "질.의"가 된다.
- 파티션키와 정렬키 외에 검색/질의를 하기 위해서는 보조인덱스를 사용하여, 인덱싱 --> 질의 하는 방법을 사용할 수 있다.

Python SDK - DynamoDB (Pratice-03)
[ 실습 목표 ]
- 프로그램 (하위수준 API, 상위수준 API)을 사용하여, DynamoDB 제어
- 파티션키, 정렬키 --> Waiter를 사용 --> 테이블 생성
- 파일에서 JSON 객체 Read, Table Load
- Search (Key, Filter, Array) / Update
- PartiQL을 사용하여 DynamoDB 데이터 엑세스
Python DynamoDB SDK : https://boto3.amazonaws.com/v1/documentation/api/latest/reference/services/dynamodb.html
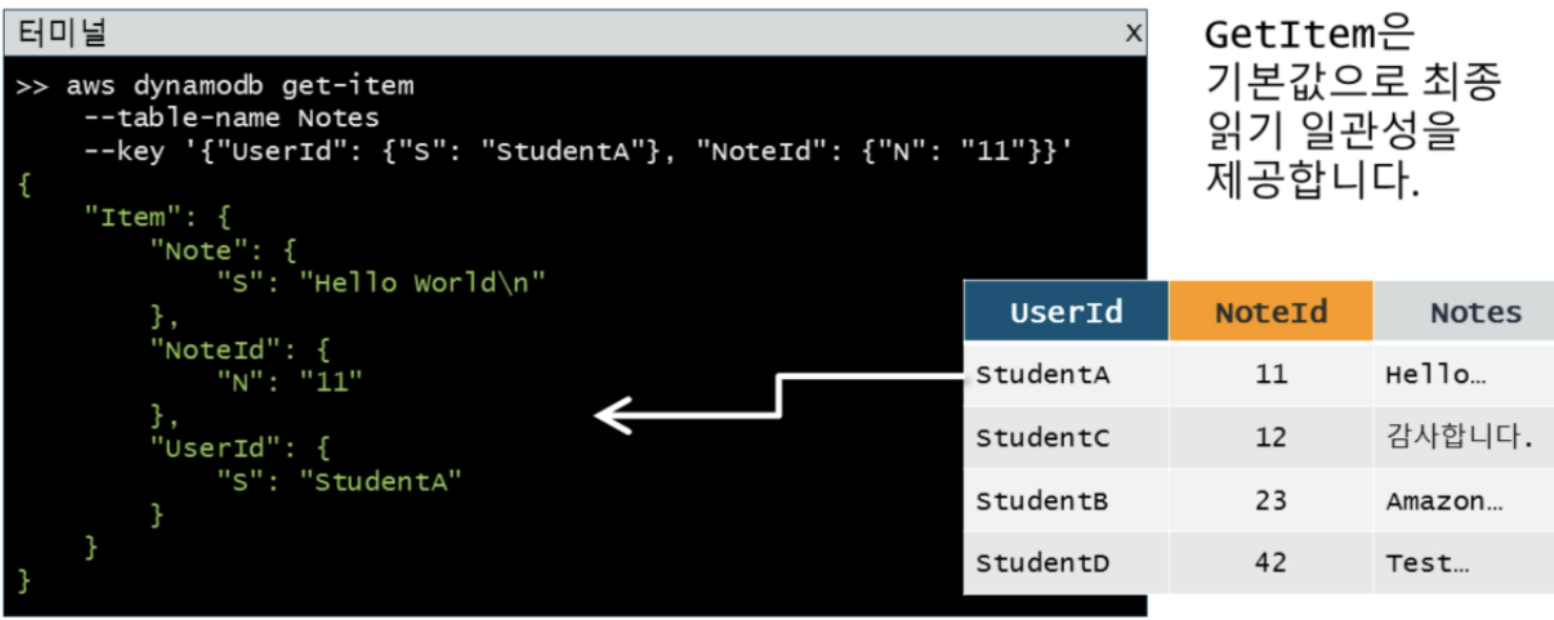
[ 항목 읽기 ]
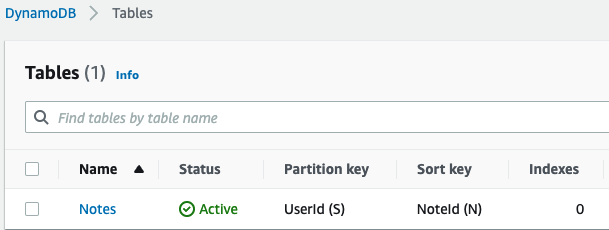
- aws dynamodb get-item --table-name Notes --key '{"UserId":{"S": "StudentA"}, "NoteId":{"N": "11"} }'
[ 쿼리 질의 하기 ]

스캔 (Scan)

업데이트

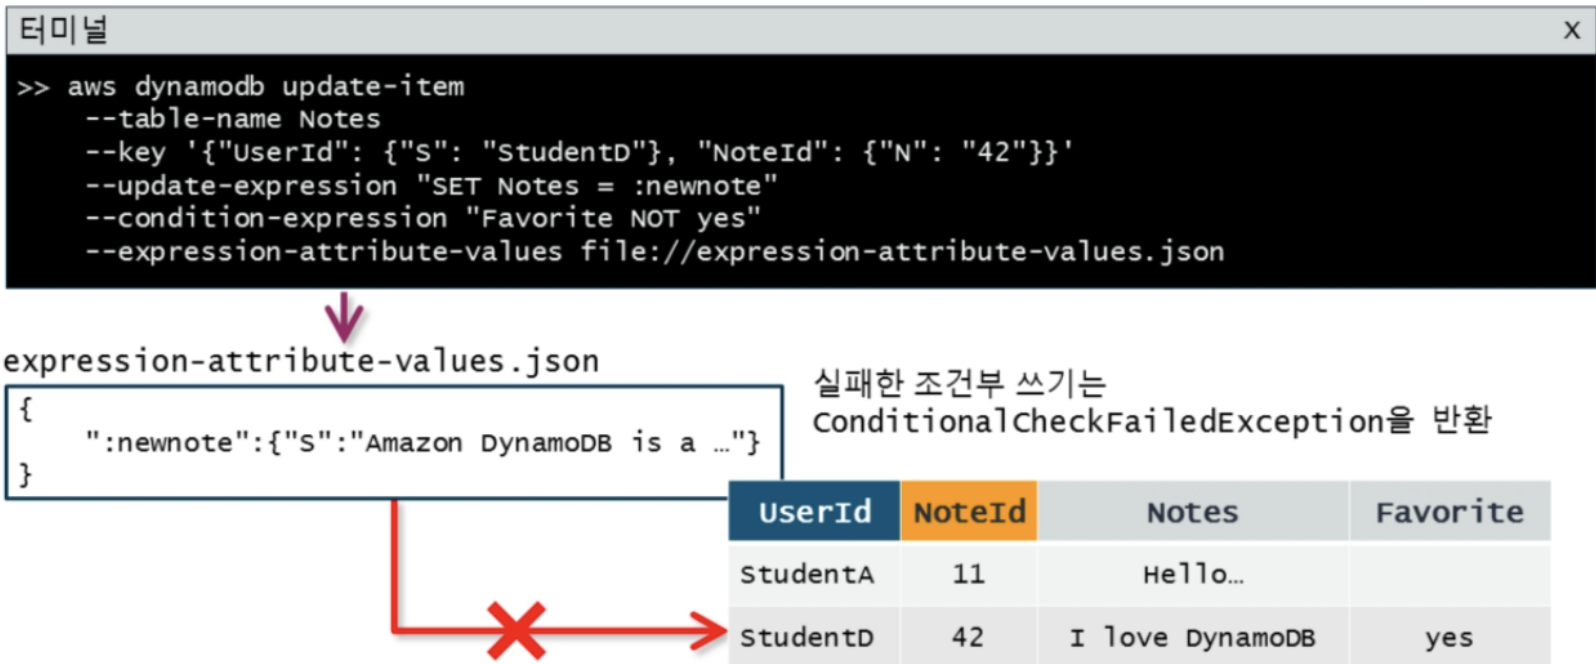
[ 조건부 쓰기 작업 ]
[ 항목 삭제 ]

Python SDK 활용 DynamoDB 제어 (Practice-03)


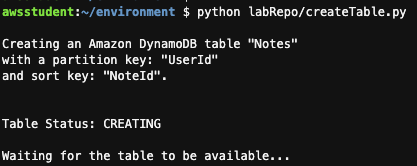
첫번째 주어진 미션은 "DynamoDB 테이블을 생성"하는 것.
이것을 위해서,
- DynamoDB 개체를 생성
- Table Creation
- Wait unti table exists
[ 설정파일 (config.ini) ]
[DynamoDB]
tableName = Notes
partitionKey = UserId
sortKey = NoteId
readCapacity = 5
writeCapacity = 5
sourcenotes = ./labRepo/notes.json
queryUserId = student
pageSize = 3
queryNoteId = 5
notePrefix = The maximum item size in DynamoDB is
설정 파일 처리 (config.ini) - configparser
import configparser
def readConfig():
    config = configparser.ConfigParser()
    config.read('./labRepo/config.ini')

    return config['DynamoDB']
[ Dynamo DB 개체 생성 ]
client = boto3.client('dynamodb')
[Dynamo DB Table Create]
    response = ddbClient.create_table(
        AttributeDefinitions=[
            {
                'AttributeName': tableDefinition["partitionKey"],
                'AttributeType': 'S',
            },
            {
                'AttributeName': tableDefinition["sortKey"],
                'AttributeType': 'N',
            },
        ],
        KeySchema=[
            {
                'AttributeName': tableDefinition["partitionKey"],
                'KeyType': 'HASH',
            },
            {
                'AttributeName': tableDefinition["sortKey"],
                'KeyType': 'RANGE',
            },
        ],
        ProvisionedThroughput={
            'ReadCapacityUnits': int(tableDefinition["readCapacity"]),
            'WriteCapacityUnits': int(tableDefinition["writeCapacity"]),
        },
        TableName=tableDefinition["tableName"]
    )
[ Wait until Exists ]
waiter = ddbClient.get_waiter('table_exists')
waiter.wait( TableName=tableName )
[ 데이터 입력 ]
Table은 생성했으나 아직은 어떠한 데이터/아이템도 입력하지 않았다.
우선 데이터 아이템을 입력해 보자. 이때 위에서 정의한 PartitionKey와 SortKey는 모두 포함되어야 한다. 즉, PartitionKey인 "UserId" 또는 sortKey인 "NoteId"를 생략하면 안된다는 이야기이다.
다음은 note가 주어질 때 table에 데이터를 입력하는 함수이다.
def putNote(table, note):
    print("loading note " + str(note))

    table.put_item(
        Item={
            'UserId': note["UserId"],
            'NoteId': int(note["NoteId"]),
            'Note': note["Note"]
        }
    )
putNote함수와 JSON 파일을 이용하여 아래와 같이 Item을 입력할 수 있다.
    f = open(jsonFileName)

    print("\n Loading \"" + tableName +
        "\" table with data from file \"" + jsonFileName + "\"\n\n")
    # Load json object from file
    notes = json.load(f)

    # Create dynamodb table resource
    table = ddbResource.Table(tableName)

    # Iterating through the notes and putting them in the table
    for n in notes:
        putNote(table, n)


[ 데이터 쿼리 by PartitionKey ]
def main(ddbClient):

    ##load configuration data from file
    config = readConfig()

    tableName = config['tableName']
    UserId = config['queryUserId']

    print("\n************\nQuerying for notes that belong to user " + UserId + "...\n")
    printNotes(queryNotesByPartitionKey(ddbClient, tableName, UserId))

def queryNotesByPartitionKey(ddbClient, tableName, qUserId):

    response = ddbClient.query(
        TableName=tableName,
        KeyConditionExpression='UserId = :userId',
        ExpressionAttributeValues={
            ':userId': {"S": qUserId}
        },
        ProjectionExpression="NoteId, Note"
    )

    return response["Items"]
결과
{"Note": "DynamoDB is NoSQL", "NoteId": "1"}
{"Note": "A DynamoDB table is schemaless", "NoteId": "2"}
{"Note": "PartiQL is a SQL compatible language for DynamoDB", "NoteId": "3"}
{"Note": "I love DyDB", "NoteId": "4"}
{"Note": "Maximum size of an item is ____ KB ?", "NoteId": "5"}
[ 스캔 / 페이지네이트 ]
def main(ddbClient):
    ##load configuration data from file
    config = readConfig()
    tableName = config['tableName']
    pageSize = config['pageSize']
    print("\n************\nScanning with pagination...\n")
    queryAllNotesPaginator(ddbClient, tableName, pageSize)

def queryAllNotesPaginator(ddbClient, tableName, pageSize):
	paginator = ddbClient.get_paginator('scan')

    page_iterator = paginator.paginate(
        TableName=tableName,
        PaginationConfig={
            'PageSize': pageSize
        })

    pageNumber = 0
    for page in page_iterator:
        if page["Count"] > 0:
            pageNumber += 1
            print("Starting page " + str(pageNumber))
            printNotes(page['Items'])
            print("End of page " + str(pageNumber) + "\n")
결과 : 페이지 사이즈 (==>3)으로 나누어서 출력되는 것을 확인 할 수 있다.
Starting page 1
{"Note": "hello", "UserId": "testuser", "NoteId": "1"}
{"Note": "this is my first note", "UserId": "testuser", "NoteId": "2"}
{"Note": "DynamoDB is NoSQL", "UserId": "student", "NoteId": "1"}
End of page 1

Starting page 2
{"Note": "A DynamoDB table is schemaless", "UserId": "student", "NoteId": "2"}
{"Note": "PartiQL is a SQL compatible language for DynamoDB", "UserId": "student", "NoteId": "3"}
{"Note": "I love DyDB", "UserId": "student", "NoteId": "4"}
End of page 2

Starting page 3
{"Note": "Maximum size of an item is ____ KB ?", "UserId": "student", "NoteId": "5"}
{"Note": "Free swag code: 1234", "UserId": "newbie", "NoteId": "1"}
{"Note": "I love DynamoDB", "UserId": "newbie", "NoteId": "2"}
End of page 3
[ 업데이트 ]
def main(ddbClient):
    config = readConfig()
    tableName = config['tableName']
    qUserId = config['queryUserId']
    qNoteId = config['queryNoteId']
    notePrefix = config['notePrefix']

    print("\nUpdating the note flag for remediation...\n")
    print(updateNewAttribute(ddbClient, tableName, qUserId, qNoteId))

    print("\nRemediating the marked note...\n")
    print(updateExistingAttributeConditionally(ddbClient, tableName, qUserId, qNoteId, notePrefix))


def updateNewAttribute(ddbClient, tableName, qUserId, qNoteId):
    response = ddbClient.update_item(
        TableName=tableName,
        Key={
            'UserId': {'S': qUserId},
            'NoteId': {'N': str(qNoteId)}
        },
        ReturnValues='ALL_NEW',
        UpdateExpression='SET Is_Incomplete = :incomplete',
        ExpressionAttributeValues={
            ':incomplete': {'S': 'Yes'}
        }
    )
컬럼이 추가 되었음을 확인 할수 잇다.

[ PartiQL 을 사용하여 질의 ]
def main(ddbClient):
    config = readConfig()
    tableName = config['tableName']
    UserId = config['queryUserId']
    NoteId = config['queryNoteId']
    print("\n************\nQuerying for note " + str(NoteId) + " that belongs to user " + UserId + "...\n")
    printNotes(querySpecificNote(ddbClient, tableName, UserId, NoteId))

def querySpecificNote(ddbClient, tableName, qUserId, qNoteId):
    response = ddbClient.execute_statement(
        Statement="SELECT * FROM " + tableName + " WHERE UserId = ? AND NoteId = ?",
        Parameters=[
            {"S": qUserId},
            {"N": str(qNoteId)}
        ]
    )
서버리스 (Serverless )
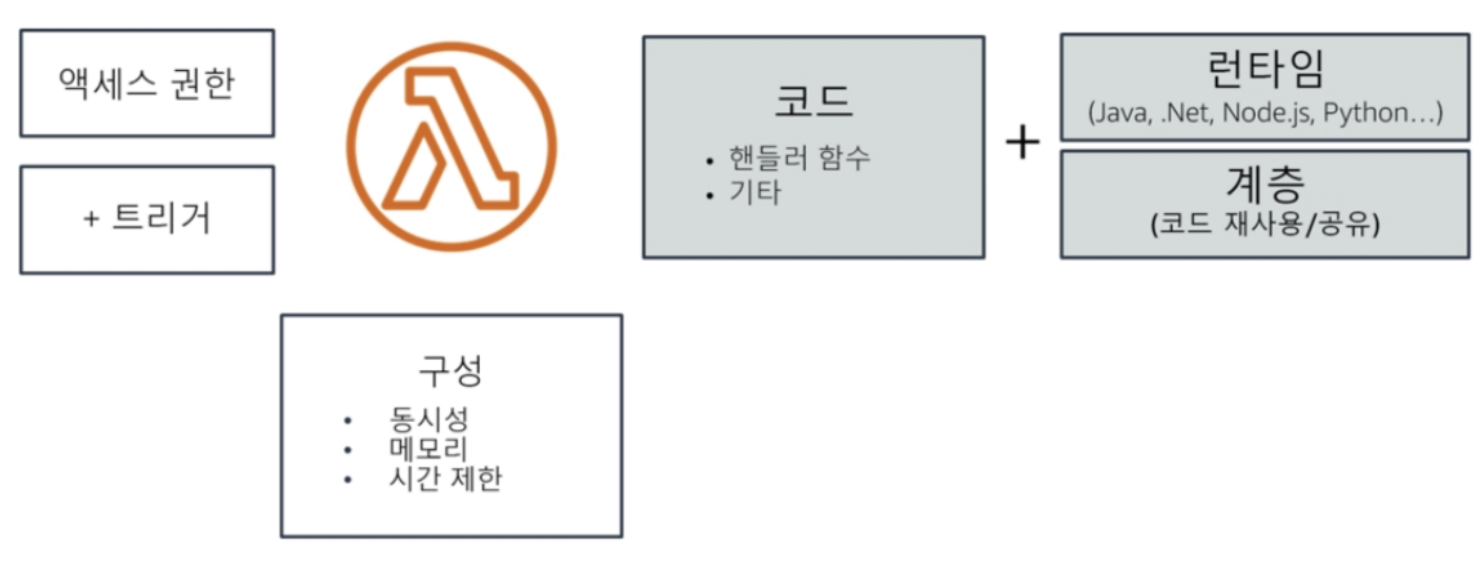

AWS의 컴퓨팅 서비스 의 추상화 수준
- 추상화 정도 : EC2 인스턴스 --> 컨테이너 (ECS, EKS) --> 서버리스 (AWS Lambda)
AWS Lambda 호출 방법

- 동기식 (직접 호출)
- AWS CLI 도는 SDK에서 직접 호출하는 방식
- Push방식/이벤트 방식
- ex) 특정 Bucket에 데이터가 들어오면 Lambda 호출하도록 Trigger 등록
- Bucket쪽에서 Lambda 함수를 호출
- 당연하게도, Bucket에 Lambda를 호출할 수 있는 권한이 있어야함
- Pull 방식
- ex) Lambda가 10초에 한번씩 DynamoDB의 변경정보 여부 점검
- Lambda 함수에서 DynamoDB를 사용할 수 있는 권한이 있어야함

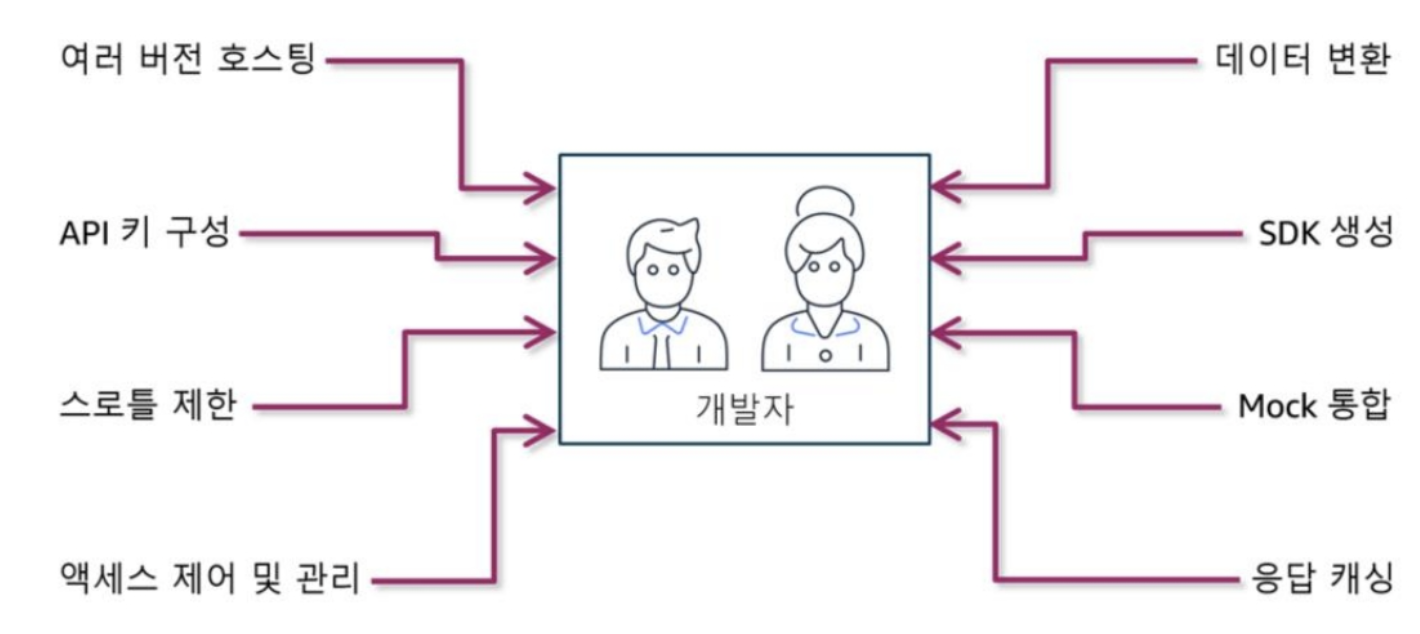
API Gateway
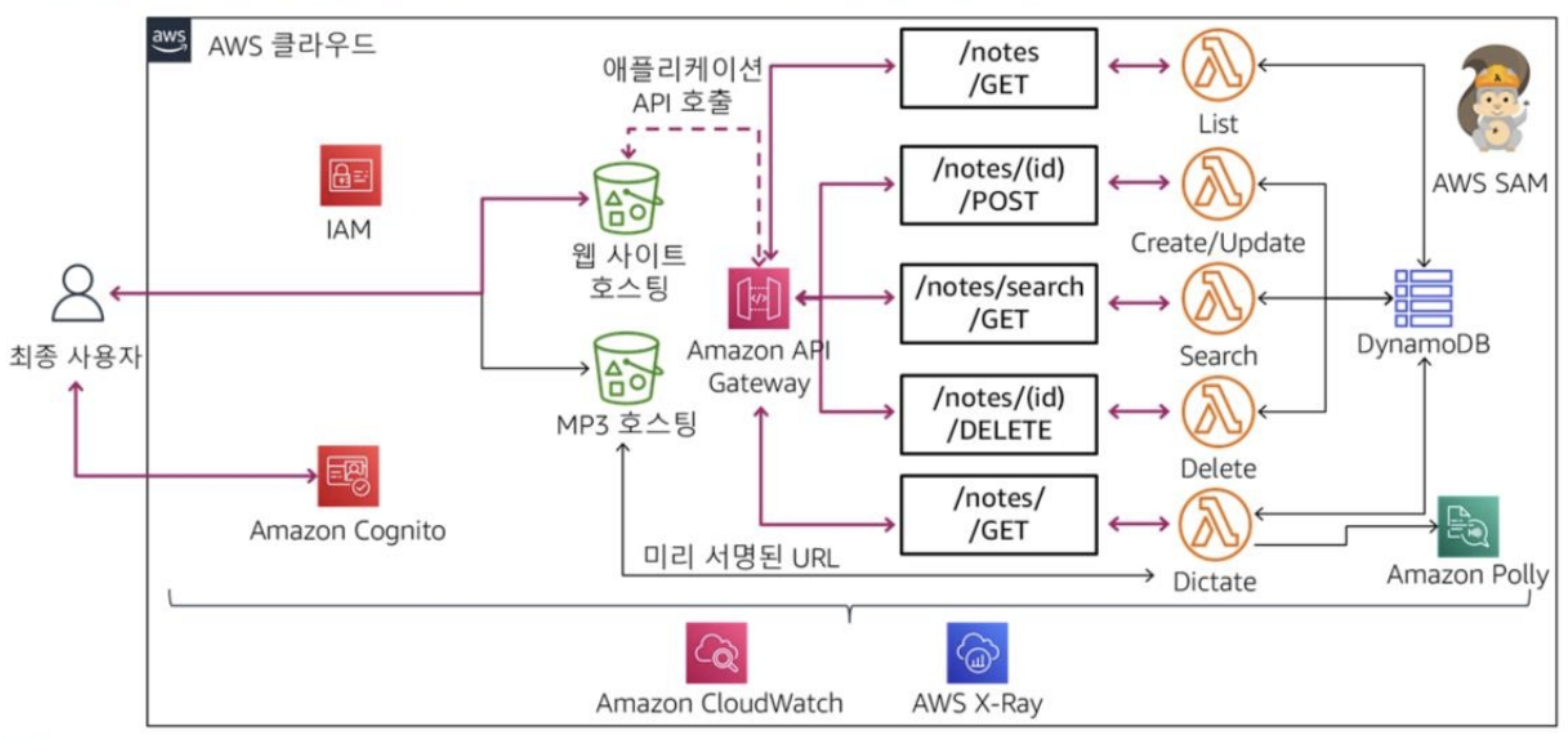
AWS Lambda 사용한 솔루션 개발 (Practice-04)
[ 실습 목표 ]
| - AWS Lambda 함수 생성 - AWS SDK / CLI 사용하여 제어 - Lambda 함수를 구성하고 환경변수활용 - AWS SDK -> 버킷 객체에 엑세스 - AWS CLI 사용하여 AWS Lambda 함수 호출 |
 |


우선, AWS Web Console에서 Lambda 함수를 만들어 보자.
- Service > Lambda > Create Function 버튼
- function Name : dictate-function
- Runtime : Python 3.9 (버전에 맞게 선택)
- Change default execution role > Use an existing role 선택 후, Existing Role에서 "lambdaPollyRole"선택
- Create Function 버튼 클릭
위 과정을 통하여 기본으로 생성된 Lambda_function은 다음과 같다.

처음이므로 이해하기 쉽도록, Web Console을 사용하여 Lambda Function을 생성하였다. 그러나, AWS CLI / SDK를 사용하여 Lambda Function을 생성할 수도 있다. AWS CLI를 통한 Lambda Function Create는 본 포스팅의 후반부 쪽에서 다루도록 하겠다.
이제 CLI를 통하여 Lambda를 제어 해 보자.
우선 자주 명령줄 내에 삽입될 버킷이름을 구하여, 변수로 저장해 놓도록 하자. 아래는 2가지 변수를 지정한다.
- `aws s3api list-buckets` 저수준 api를 사용하여 s3 bucket 이름에 "apibucket" 포함된 버킷을 찾고, 버킷의 이름을 "apiBucket" 으로 저장한다.
- notesTable에는 테이블이름인 "Notes"를 저장한다.
apiBucket=$(aws s3api list-buckets --output text --query 'Buckets[?contains(Name, `apibucket`) == `true`] | [0].Name')
notesTable='Notes'
실습 환경에는 이미 S3버킷이 생성되어 있다. 버킷의 이름은 qls-xxxxxx-xxxxxxxxxxxxxxx-pollynotesapibucket-xxxxxxxxxx 등의 형태로 이름이 지어져 있는데, "xxxxxxx"등의 수치는 그때 그때 변경 되므로 버킷이름을 찾기 위해서 번거롭지만 위와 같이 "apibucket" 문자열을 "contains" 하고 있는 개체를 찾는 과정을 수반한다.
[ Lambda Function Update ]
앞서 Web Console에서 Lambda funtion을 이미 생성해 두었으므로, 생성 단계는 건너 뛴다. 일단 Lambda function의 설정을 업데이트 해보도록 한자. 다음은 Lambda Function의 환경 변수를 업데이트 한다. 앞서 확인한 버킷의 이름과 테이블 이름을 미리 업데이트 해준다. (참고로, Function을 생성할 때 environment Variables를 한꺼번에 입력할 수 있다. )
aws lambda update-function-configuration \
--function-name dictate-function \
--environment Variables="{MP3_BUCKET_NAME=$apiBucket, TABLE_NAME=$notesTable}"
명령어를 실행하면 현재 Labmda Function의 설정 값들을 JSON으로 보여 준다. 여러 반환 값중 아래와 같이 환경변수가 설정 되어 있는 것을 확인 할 수 있다.

더보기
Lambda Function으로 업로드하고자 하는 대상
from __future__ import print_function
import boto3
import os
from contextlib import closing

dynamoDBResource = boto3.resource('dynamodb')
pollyClient = boto3.client('polly')
s3Client = boto3.client('s3')

def lambda_handler(event, context):
    UserId = event["UserId"]
    NoteId = event["NoteId"]
    VoiceId = event['VoiceId']
    mp3Bucket = os.environ['MP3_BUCKET_NAME']
    ddbTable = os.environ['TABLE_NAME']

    text = getNote(dynamoDBResource, ddbTable, UserId, NoteId)
    filePath = createMP3File(pollyClient, text, VoiceId, NoteId)
    signedURL = hostFileOnS3(s3Client, filePath, mp3Bucket, UserId, NoteId)

    return signedURL

def getNote(dynamoDBResource, ddbTable, UserId, NoteId):

    table = dynamoDBResource.Table(ddbTable)
    records = table.get_item(
        Key={
            'UserId': UserId,
            'NoteId': int(NoteId)
        }
    )
    return records['Item']['Note']

def createMP3File(pollyClient, text, VoiceId, NoteId):
    pollyResponse = pollyClient.synthesize_speech(
        OutputFormat='mp3',
        Text = text,
        VoiceId = VoiceId
    )

	if "AudioStream" in pollyResponse:
        postId = str(NoteId)
        with closing(pollyResponse["AudioStream"]) as stream:
            filePath = os.path.join("/tmp/", postId)
            with open(filePath, "wb") as file:
                file.write(stream.read())

    return filePath

def hostFileOnS3(s3Client, filePath, mp3Bucket, UserId, NoteId):
    s3Client.upload_file(filePath,
                        mp3Bucket,
                        UserId+'/'+NoteId+'.mp3')
    os.remove(filePath)

    url = s3Client.generate_presigned_url(
        ClientMethod='get_object',
        Params={
            'Bucket': mp3Bucket,
            'Key': UserId+'/'+NoteId+'.mp3'
        }
    )

    return url
lambda function으로 업로드 할 때는, zip압축 파일 형태로 업로드 해야 한다. 따라서, 사용하고자 하는 함수 파일(ex. app.py)을 zip으로 압축하도록 하자.
zip dictate-function.zip app.py
압축된 파일을 이제 lambda function으로 업데이트 한다.
aws lambda update-function-code \
--function-name dictate-function \
--zip-file fileb://dictate-function.zip
function-name은 윗 단계 AWS Console에서 생성한 Lambda Function/Layer의 이름이다. zip-file은 본인이 압축한 zip파일의 이름이다.
function의 소스/압축파일은 업로드를 했지만, 아직 function이 동작해야하는 handler가 어디에 있는지 지정해 주지 않았다. configuare update를 통해 핸들러를 지정해 주자.
aws lambda update-function-configuration \
--function-name dictate-function \
--handler app.lambda_handler
[ Lambda Function 호출 ]
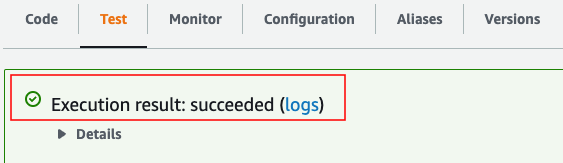
이제 본인의 코드로 Lambda Function을 업데이트 완료 했다. 이제 실제 호출하여 정상 동작하는지 살펴볼 차례이다.
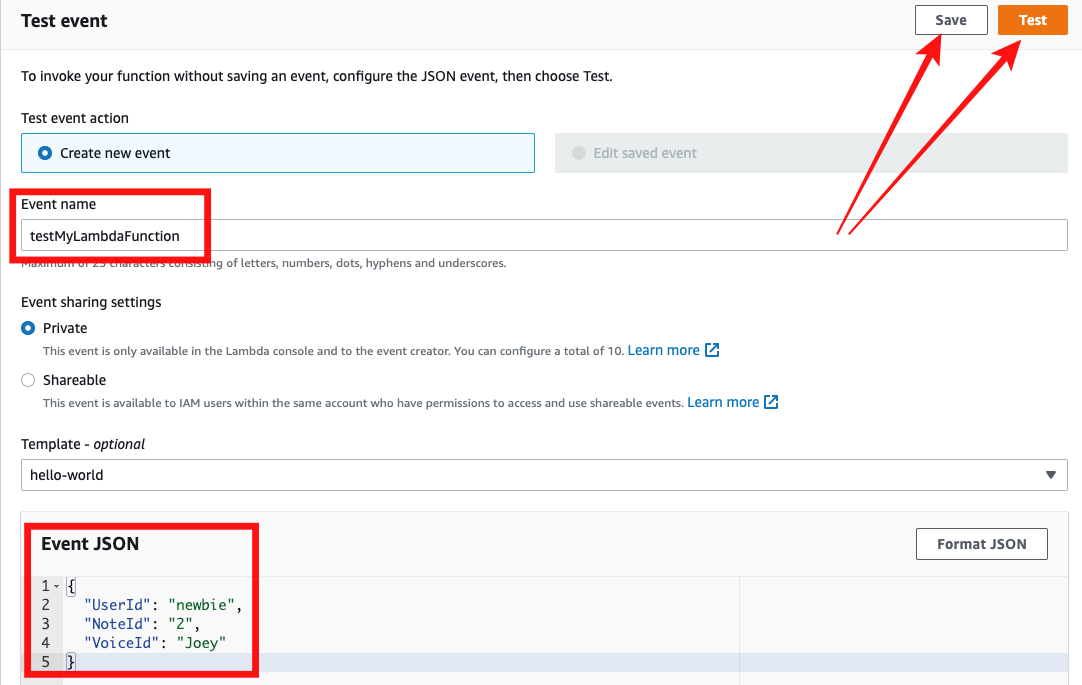
우선 Lambda Function을 호출할 때 입력값 데이터를 만들어 보자.
cat > event.json
{
  "UserId": "newbie",
  "NoteId": "2",
  "VoiceId": "Joey"
}
^C
그 다음 `aws lambda invoke`를 사용하여 직접 호출 해 준다. 이 때, function-name으로 대상 (lambda function)을 지정해 주고, 입력값은 --payload 옵션으로 지정해 준다.
aws lambda invoke \
--function-name dictate-function \
--payload fileb://event.json outputs.txt
outputs.txt에는 Lambda Function -> handler의 결과 값이 반환 되어 있을 것이다.
[ Lambda Function 동작 결과 확인]
- Lambda Function이 정상 동작 했다면, output.txt에 예상되는 결과가 기록 되어 있을 것이다.
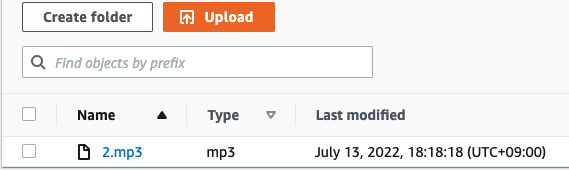
- 우리가 사용한 Lambda Function은 입력값이 들어올 때, 해당 조건에 매칭되는 Data Item을 DynamoDB 찾고, 메모 텍스트를 음성으로 읽어 (TTS : AWS Polly 서비스), MP3파일로 변환하여 S3 버킷에 저장하는 함수이다. 따라서, 실행 후 지정된 AWS Bucket에 MP3이 저장되어 있는지 확인해 보자.
[ AWS Web Console에서 Lambda Function TEST ]
Lambda Function에 대한 1회적인 실행/테스트는 웹 콘솔을 통해서 도 테스트 할 수 있다.
- AWS Service > Lambda > Functions > "내가 만든 function 이름" 이동
- 화면 중간쯤 위치한 탭중 > TEST 탭 클릭
- Event Name을 지정해 주고, --payload에 해당하는 함수 입력값을 JSON 형태로 입력해 준다.
- 그 다음 "save"버튼을 눌러 저장하고, "Test" 버튼을 눌러 테스트를 진행한다.

[ Lambda Function 생성 ]
AWS CLI를 통한 Lambda 함수의 생성은 업데이트/수정과 비교하여 조금은 더 까다롭다. 그 이유는 권한/역할에 대한 설정 때문이다. 이 교육에서는 역할에 대한 설정은 사전 정의된 역할로 대체한다. 아래는 미리 정의된 역할중 "lambdaPollyRole"이라는 역할에 대한 리소스명(arn)을 구하고, "roleArn"에 저장한다.
roleArn=$(aws iam list-roles --output text --query 'Roles[?contains(RoleName, `lambdaPollyRole`) == `true`].Arn')
Lambda Function의 생성 자체는 이전 API 사용과 유사 하다.
aws lambda create-function \
--function-name create-function  \
--handler app.lambda_handler \
--runtime python3.9 \
--role $roleArn \
--environment Variables={TABLE_NAME=$notesTable} \
--zip-file fileb://create-function.zip
생성하고자 하는 function의 이름을 "create-function", 소스의 압축파일 이름을 "create-function.zip"이라고 가정한다.
function update와 달리, configure를 한꺼번에 지정하여 생성하는 차이가 있다. handler, runtime, role, environment를 한꺼번에 지정하여 생성한다.
반응형
'개발 이야기' 카테고리의 다른 글
| [AWS 교육 요약] Developing on AWS (3/3) (0) | 2022.07.18 |
|---|---|
| [AWS 교육 요약] - Developing on AWS (1/3) (0) | 2022.07.13 |
| [텐서플로우] TFIO/TFIO.audio 설치 에러 - NotImplementedError (0) | 2022.07.06 |
| [ 코딩 ] 알고리즘 공부 및 경시대회 리스트 (0) | 2022.05.13 |
| [React] CRA / WebPack Error - Module not Found : Can't resolve xx (0) | 2022.05.06 |


댓글 영역